ApplicationWindow (メニューバー、ツールバー、ステータスバー付きのフレーム)
JFaceが提供するApplicationWindowには、メニューバーやツールバーなどを表示するためのフレームワークが用意されており、容易にカスタマイズすることが可能です。
メニューバーの追加
メニューバーを追加するには、ApplicationWindowのcreateMenuManagerをオーバーライドし、コンストラクタでaddMenuBarメソッドを呼び出しします。イディオムとしては、下のようになります。
private ExitAction exitAction;
public ApplicationWindowTest() {
    super(null);
    exitAction = new ExitAction(this);

    ...
    addMenuBar();
    ...
}

protected MenuManager createMenuManager() {
    MenuManager menuBar = new MenuManager("");
    MenuManager fileMenu = new MenuManager("&File");

    fileMenu.add(exitAction);
    menuBar.add(fileMenu);
    return menuBar;
}
ツールバーの追加
ApplicationWindowにツールバーを追加するには、createToolBarManagerをオーバーライドし、コンストラクタでaddToolBarメソッドを呼びます。このメソッドが実行されるとスーパークラスでcreateToolBarManagerが自動的に呼ばれることになっています。ToolBarManagerはツールバーを管理するクラスで、SWTのActionオブジェクトを追加すると、そのオブジェクトに対応したアイコンがツールバーに表示される仕組みです。
public ApplicationWindowTest() {
        super(null);
        exitAction = new ExitAction(this);
        ...
        addToolBar(SWT.FLAT);
        ...
}
protected ToolBarManager createToolBarManager(int style) {
        ToolBarManager tbm = new ToolBarManager(style);
        tbm.add(exitAction);
        return tbm;
}
ステータスラインの追加
ステータスラインを追加するには、コンストラクタでaddStatusLineメソッドを実行します。setStatus(String)を呼び出すことで、ステータスラインにメッセージを表示することができます。
public ApplicationWindowTest() {
        ...
        addStatusLine();
        ...
}
...
        setStatus("....");
...
サンプルアプリケーション
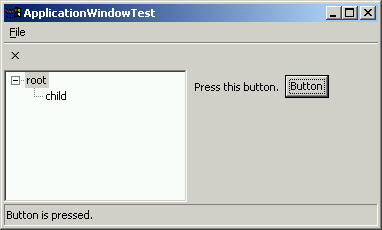
以上の説明をまとめたものが、下のサンプルです。ApplicationWindowにメニューバー、ツールバー、ステータスバーが追加されているのが分かると思います。ボタンを押すと、ステータスバーにメッセージが現れます。なおこのサンプルを実行するには、GIFイメージclose.gifが必要です。このようなコードをテンプレートとして、少しずつ機能を追加しながら開発を進めていけばよいでしょう。
ソースコード (ApplicationWindowTest.java)
import java.net.*;

import org.eclipse.jface.action.Action;
import org.eclipse.jface.action.MenuManager;
import org.eclipse.jface.action.ToolBarManager;
import org.eclipse.jface.resource.ImageDescriptor;
import org.eclipse.jface.window.ApplicationWindow;
import org.eclipse.swt.SWT;
import org.eclipse.swt.custom.SashForm;
import org.eclipse.swt.events.SelectionAdapter;
import org.eclipse.swt.events.SelectionEvent;
import org.eclipse.swt.layout.*;
import org.eclipse.swt.widgets.*;

public class ApplicationWindowTest extends ApplicationWindow {

        private ExitAction exitAction;

        public ApplicationWindowTest() {
                super(null);

                //Actionは先にインスタンスを作成しておく
                exitAction = new ExitAction(this);

                addStatusLine();
                addMenuBar();
                addToolBar(SWT.FLAT);
        }
        public static void main(String[] args) {
                ApplicationWindow w = new ApplicationWindowTest();
                w.setBlockOnOpen(true);
                w.open();
                Display.getCurrent().dispose();
        }

        protected Control createContents(Composite parent) {
                getShell().setText("ApplicationWindowTest");
                Composite container = new Composite(parent, SWT.NONE);
                container.setLayout(new FillLayout());

                SashForm sash = new SashForm(container, SWT.HORIZONTAL);
                Tree tree = new Tree(sash, SWT.SINGLE | SWT.BORDER);
                TreeItem root = new TreeItem(tree, SWT.NONE);
                root.setText("root");
                TreeItem child = new TreeItem(root, SWT.NONE);
                child.setText("child");

                Composite c = new Composite(sash, SWT.NONE);
                c.setLayout(new GridLayout(2, false));
                new Label(c, SWT.NONE).setText("Press this button.");
                Button button = new Button(c, SWT.PUSH);
                button.setText("Button");
                button.addSelectionListener(new SelectionAdapter() {
                        public void widgetSelected(SelectionEvent e) {
                                setStatus("Button is pressed.");
                        }
                });

                return container;
        }

        protected MenuManager createMenuManager() {
                MenuManager menuBar = new MenuManager("");
                MenuManager fileMenu = new MenuManager("&File");

                fileMenu.add(exitAction);
                menuBar.add(fileMenu);
                return menuBar;
        }

        protected ToolBarManager createToolBarManager(int style) {
                ToolBarManager tbm = new ToolBarManager(style);
                tbm.add(exitAction);
                return tbm;
        }

}

class ExitAction extends Action {
        ApplicationWindow window;

        public ExitAction(ApplicationWindow w) {
                window = w;
                setText("E&xit@Ctrl+W");
                setToolTipText("Exit the application");
                setImageDescriptor(ImageDescriptor.createFromURL(newURL("file:close.gif")));
        }

        public void run() {
                window.close();
        }
        private URL newURL(String urlName) {
                URL url = null;
                try {
                        url = new URL(urlName);
                } catch (MalformedURLException e) {
                        e.printStackTrace();
                }
                return url;
        }

}
最新更新日: 2004年10月20日
| 関連リンク |
|
Eclipse API ドキュメント ApplicationWindow MenuManager ToolBarManager ImageDescriptor Action SashForm SelectionAdapter SelectionEvent SWT |
- PR -
【Sony】大手他社よりも安い!ビジネス向け光・100Mしかも固定IP付!今なら更に初期費用最大15,000円OFF!
![]()
オフィス用品・オフィス家具 価 格 交 渉 可!
◎ 目指せ★業界最安値 ★ ◎ オフィネット・ドットコム株式会社
![]()
